The Best Fluffy Pancakes recipe you will fall in love with. Full of tips and tricks to help you make the best pancakes.

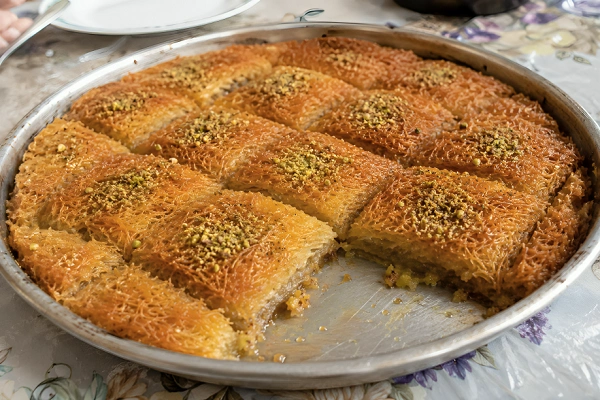
A box of frozen shredded phyllo doesn’t look like much sitting in the freezer aisle tangled, pale, and a little dry. Bake it the wrong way and it stays exactly that: dry and unremarkable.
But get the butter ratio right, press the layers properly, and pour the syrup at the right moment, and those same strands turn into something genuinely hard to stop eating crisp on top, soft and syrup-soaked underneath, with nuts running through every bite.
That gap between “looks ordinary” and “tastes incredible” is really what kadaif recipes are about, and it comes down to a handful of small decisions most people get wrong on their first try. This guide breaks down exactly what those decisions are, why they matter, and how to make kadaif without trial and error.
What Exactly Is Kadaif?
Kadaif refers to a type of shredded phyllo dough that looks like very fine, thread-like noodles, made from a thin batter of flour and water poured over a hot metal surface where it partially cooks and dries into long strands.
This dough forms the base of several Middle Eastern desserts, and in many countries the name of the dough and the kadaif dessert recipe itself are used interchangeably.
You may also see this pastry called kataifi, kadayif, or kataif, depending on the country, and a kataifi recipe found in a Greek cookbook may look slightly different from a Turkish kadaif recipe found elsewhere.
In Turkish cuisine it is usually called kadayif, however in Balkan nations like Greece, Albania, Bosnia the shredded version is called kadaif. A variation of this meal, using the same dough but packed with melty cheese instead of nuts, is often called kunafa or knafeh, and is normally served warm.
Where to Find Kadaif Dough
Fresh or frozen kadaif dough is most commonly available at Middle Eastern, Greek, or Turkish grocery stores, usually kept in the freezer section. If frozen, the dough needs to thaw in the refrigerator overnight before use, since dough that is still partially frozen tends to clump and tear instead of separating into loose strands.
Where the original is hard to find, some recipes suggest a mock version using thin noodles, toasted in butter and sugar until golden. The texture is not identical to true shredded phyllo, but it works as a reasonable substitute.
Core Ingredients in Most Kadaif Recipes
Despite regional differences, most kadaif recipes rely on a shared set of ingredients:
- Shredded phyllo dough as the base layer
- Clarified butter or unsalted butter, melted and worked through the strands
- Chopped walnuts, pistachios, or almonds as filling
- Granulated sugar, water, and lemon juice for the syrup
- Optional flavorings such as rose water, orange blossom water, vanilla extract, cinnamon, and cardamom
Walnuts are common in homestyle Balkan and Turkish versions, while pistachios tend to appear in recipes aiming for a richer color and flavor. Clarified butter, sometimes labeled as ghee, is favored over regular melted butter because it isolates the pure fat from water and milk solids, producing a crisper texture once baked.
The Role of Sugar Syrup
The sugar syrup is just as important as the pastry itself. A standard syrup combines sugar, water, and a small amount of lemon juice, simmered until it thickens slightly. The lemon juice is not purely for flavor it actually helps clarify the syrup and prevents it from crystallizing as it cools.
Many versions also include honey, vanilla extract, or floral waters like rose water or orange blossom water for a more distinct character. One thing that all well-known recipes agree on is how important it is for the syrup and baked pastry to be at different temperatures.
If both are hot, the dessert turns mushy. If both are cold, the syrup will not absorb properly. The most reliable approach is to pour cooled syrup over a warm kadaif, or warm syrup over a fully cooled one. In testing, skipping this contrast was the single biggest reason a batch turned out soggy instead of crisp.
Step-by-Step Method
- Thaw the dough in the refrigerator overnight if frozen, then bring to room temperature.
- Loosen the strands by hand so there are no compressed clumps, then work melted butter evenly through the dough.
- Spread out half of the buttered dough on a baking sheet that has been greased.
- Add the nut filling, often mixed with a touch of sugar and cinnamon.
- Top with the remaining dough, pressing down firmly a loose top layer prevents the syrup from soaking in evenly later.
- Score the pastry into diamond or square shapes before baking, so the syrup can penetrate more easily afterward.
- Bake at around 350°F (175°C) for 25 to 35 minutes, until golden brown.
- Pour the syrup over the pastry using the temperature-contrast method, then let it rest for 45 minutes to an hour to fully absorb.
If the kadaif looks dry right after baking, that is normal it should look fairly dry and matte before the syrup goes on. The syrup is what brings the moisture and shine, not the baking step itself.
Mistakes That Commonly Affect the Result
Based on how the dough, butter, and syrup behave, a few missteps tend to affect the outcome more than others. Rushing the dough-thawing step, or working with dough that is still partly frozen, often causes it to tear instead of separating into loose strands.
Not pressing the layers firmly enough before baking can leave air pockets that stop the syrup from soaking through evenly.
Pouring syrup that is the same temperature as the freshly baked kadaif tends to lead to a soggy, dense texture rather than the crisp-on-top, syrup-soaked-below result that a good kadaif should have, since the temperature contrast plays a direct role in how the layers absorb moisture.
Grinding the nuts into a paste instead of chopping them finely can also flatten the texture, since the filling loses the crunch that contrasts with the soft, syrup-soaked pastry.
Cutting the dessert into pieces only after baking, instead of before, reduces the surface area available for the syrup to soak into, which can leave the center drier than the edges.
Kadaif vs Baklava vs Kunafa
These three desserts are often confused because they share similar core ingredients, but the dough and texture set them apart:
| Dessert | Dough Type | Texture | Typical Filling |
| Kadaif | Shredded phyllo strands | Crisp, thread-like | Walnuts or pistachios |
| Baklava | Layered phyllo sheets | Flaky, layered | Walnuts, pistachios, or almonds |
| Kunafa | Shredded phyllo strands | Soft and gooey under a crisp top | Cheese (ricotta or akawi) |
For the record, kunafa and kadaif both use the same dough. But baklava is made with a different kind of pastry that is cut into sheets. The main difference between kadaif and kunafa comes down to the filling nuts versus cheese and whether the dessert is served at room temperature or warm.
Common Variations Worth Knowing
- Sheet pan kadaif: Dough pressed flat into a tray and baked, then cut into squares — the most common method.
- Kadaif rolls: Also called stuffed kadaif, where buttered dough is rolled around a nut filling into cigar-like shapes before baking.
- Nest-style kadaif: Balkan countries love it, and the strands are often shaped into nests and topped with nuts. It’s kind of like baklava.
- Cheese-filled kadaif (kunafa): A savory-sweet version using ricotta, akawi, or another mild, stringy cheese instead of nuts, typically served warm.
Serving and Storage Tips
Kadaif is traditionally served at room temperature, often alongside kaymak, a type of clotted cream, or a scoop of ice cream for contrast. It also pairs well with Turkish coffee or tea.
For storage, kadaif should be kept at room temperature, loosely covered to allow air circulation. Refrigeration tends to harden the pastry and dull its crisp texture.
Most kadaif stays enjoyable for two to four days after baking, and many people find the texture even better the day after, once the syrup has settled into the layers. Freezing baked kadaif is possible, though the top layer typically loses some of its original crispness after thawing.
Final Thoughts
What makes kadaif worth the effort isn’t a long ingredient list or a complicated technique, it’s the handful of small decisions that separate a forgettable tray from one people go back for seconds on.
The right butter, the right timing on the syrup, the right amount of pressure on the layers: none of it is hard, but skipping any one of them shows up immediately in the final texture.
It’s up to you to decide whether to use orange flower water, rose water, walnuts, pistachios, a plain syrup, or one with cinnamon and citrus. Pick a direction, follow the method closely the first time, and the kadaif recipes that once looked intimidating turn into something worth making again and again.
FAQs
Why did my kadaif turn out soggy instead of crisp?
The most common cause is pouring syrup that is the same temperature as the freshly baked pastry, but using regular butter instead of clarified butter or under-pressing the layers can make the dough more prone to absorbing moisture unevenly as well.
What can I use instead of pistachios or walnuts?
Almonds work well, and some home recipes use a mix of two or three nut types together for a layered flavor. The choice mostly comes down to personal preference rather than a strict rule.
Does kadaif taste the same in every country?
Not exactly. The base dough and method are similar everywhere, but the flavoring varies by household and region. Some versions lean on rose water or orange blossom water, while others keep the syrup plain with just sugar, water, and lemon juice. Nut choice also shifts depending on what is locally available.

Rachel Bradley is a food writer and recipe developer with a love for home cooking and global flavors. She has spent years testing recipes in her kitchen, exploring everything from quick weeknight meals to traditional dishes from around the world. Her goal is simple — make great food accessible to everyone.