The Best Fluffy Pancakes recipe you will fall in love with. Full of tips and tricks to help you make the best pancakes.

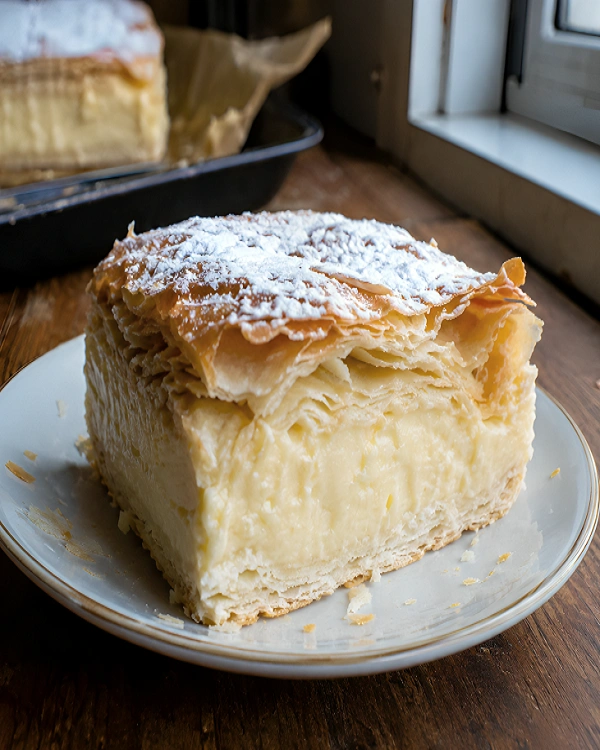
Craving something that’s crisp on the outside and soft, creamy on the inside? This krempita recipe is exactly what you’re looking for. I’ll walk you through the whole process, step by step, so you can make it at home even on your first try.

A Short History of Krempita
The story of this dessert is genuinely interesting, and it helps explain why so many regions claim it as their own. The most widely told version traces the cake back to 1923, when Đuro Lukačić moved from Vienna and Budapest to the small Croatian town of Samobor to work in his brother’s pastry shop.
Over the following years, Lukačić combined several recipe ideas from Zagreb’s confectioneries, and by the early 1950s he had settled on what became the now-famous Samobor cream slice.
From there, the dessert spread across the region, and each country gave it a local twist. In Croatia, the two best-known versions are the Samobor cream slice, made with a puff pastry top, and the Zagreb cream slice, which uses a chocolate glaze instead.
Further south, the puff-pastry version with plain custard became known simply as krempita, a name still used in kitchens across Serbia, Bosnia, and Montenegro today.
There’s also a lesser-known coastal variation worth mentioning. In Montenegro, the Kotorska krempita, also called Kotorska pašta, stands out because it’s made with three layers of dough and two layers of cream instead of the usual two-and-one structure, and the town of Kotor even holds an annual festival dedicated to it.
Ingredients You’ll Need

This recipe makes one 9×13-inch pan, which is roughly 12 generous squares.
For the pastry layers:
- 2 sheets of store-bought puff pastry, thawed
- 1 tablespoon of flour to dust the work area
For the custard filling:
- 1 liter (about 4 cups) whole milk
- 8 large egg yolks
- 200 grams (1 cup) granulated sugar
- 100 grams (¾ cup) cornstarch
- 1 teaspoon vanilla extract
- A pinch of salt
For finishing:
- 2 tablespoons powdered sugar, for dusting
Whole milk gives the filling its richness, and using egg yolks instead of whole eggs keeps the texture smooth rather than eggy. If you only have all-purpose flour on hand instead of cornstarch, you can use it, but the cream will feel slightly heavier and less silky.
How to Make Krempita
Step 1: Bake the Pastry

Preheat your oven to 200°C (400°F). Lightly dust your work surface with flour and roll out each puff pastry sheet so it fits your 9×13-inch pan. Prick both sheets all over with a fork to stop them from puffing up unevenly, then place them on baking sheets lined with parchment paper.
Bake each sheet until golden brown and crisp, about 12 to 15 minutes. Let both sheets cool completely on a wire rack while you prepare the custard.
Step 2: Make the Filling
Pour the milk into a large saucepan and warm it gently over medium heat. Don’t let it come to a boil, you just want it hot enough to steam.
While the milk heats, whisk the egg yolks, sugar, cornstarch, and salt together in a large bowl until the mixture is smooth and pale.

Once the milk is hot, slowly pour about a third of it into the egg mixture while whisking constantly. This step, called tempering, keeps the eggs from scrambling. Once combined, pour the tempered egg mixture back into the saucepan with the rest of the milk.
Cook over low to medium heat, stirring constantly with a whisk or wooden spoon, until the mixture thickens enough to coat the back of a spoon. In most cases, it takes between six and eight minutes. Take it off the heat and stir in the vanilla extract while it is still hot.
Step 3: Assemble the Krempita

Place one sheet of baked puff pastry into the bottom of your pan, trimming it if needed so it fits snugly. Pour the warm filling over the pastry and spread it into an even layer using a spatula.
Let the cream cool for about 10 minutes at room temperature, then place the second sheet of puff pastry on top, pressing down gently so it settles into the filling slightly.
Step 4: Chill and Set
Cover the pan loosely and refrigerate for at least 4 hours, though overnight is better if you have the time. This resting period allows the filling to firm up so that the squares hold their shape when you cut them.
Step 5: Cut and Serve
Once fully chilled, dust the top generously with powdered sugar. Use a sharp knife to cut the krempita into squares, wiping the blade clean between cuts for neat edges. Serve chilled, straight from the fridge.
Tips for Getting It Right
Keep stirring the mixture as it cooks. It can go from silky to scrambled in under a minute if it’s left unattended over heat, so stay close to the stove during this step.
Let the pastry cool fully before adding the filling. Warm pastry will soften and lose its crispness much faster once it touches the cream layer.
If your kitchen runs warm, keep the krempita refrigerated until just before serving, since the filling softens quickly at room temperature and clean cuts get harder to manage.
Storing Leftovers
Krempita keeps well in the refrigerator for up to 3 days when covered tightly. The pastry will soften gradually over time, which is normal, but the flavor stays just as good. This dessert isn’t well suited to freezing, since the filling tends to separate and the pastry loses its texture once thawed.
A Dessert Worth Sharing
What makes krempita special isn’t just the recipe itself, but the fact that it has stayed largely unchanged for decades while still meaning something different in every kitchen it’s made in.
Whether you know it as krempita, kremšnita, or vanilla slice, the appeal comes down to one simple thing: a treat that feels light on the fork and satisfying with every bite. When you make it yourself, you’ll understand why it’s been served at family meals for so long.
FAQs
Why is my krempita runny?
Usually, the filling isn’t cooked enough or hasn’t been chilled long enough. The custard should coat the back of a spoon before you take it off the heat. If it’s still thin, cook it a bit longer, and always give it at least 4 hours in the fridge before cutting.
Can I freeze krempita?
No, freezing isn’t recommended. The custard tends to separate and turn watery once thawed, and the pastry loses its crunch. If you want to prep ahead, bake the pastry sheets early and make the filling fresh on serving day.
What’s the difference between krempita and kremšnita?
They’re regional names for the same dessert family. Kremšnita is used in Croatia, where the Samobor version has a pastry top and the Zagreb version has chocolate glaze instead. Krempita is the name used in Serbia, Bosnia, and Montenegro for the simpler puff pastry and custard version.
How do I cut it cleanly?
Chill it fully before cutting. Dip your knife in hot water, wipe it dry, and use a gentle sawing motion instead of pressing straight down. This stops the filling from squeezing out and keeps the layers together.

James Carter is a food researcher and writer passionate about global cuisines, street food, and the stories behind what we eat. He combines thorough research with a genuine love for food culture to bring readers accurate, well-written, and interesting content.