The Best Fluffy Pancakes recipe you will fall in love with. Full of tips and tricks to help you make the best pancakes.
History of food and recipes · 10 minutes to read
Most no-bake desserts are either too simple to be interesting or too complicated to be worth the effort. Pashka is neither. It is a traditional Russian Easter dessert made from farmers cheese, butter, eggs, dried fruit, and citrus and it requires almost no active cooking time.
Pashka has to be kept in the fridge for at least 48 hours before it’s ready, which is a long time. But that wait is exactly what makes it so good. Once you take it out of the mold, the flavors have intensified and the texture has set. Now you have a one-of-a-kind gift that has been around for hundreds of years and can be cut up. It makes a nice presentation and tastes good. This is the right way to do it, from beginning to end.
What Is Pashka?
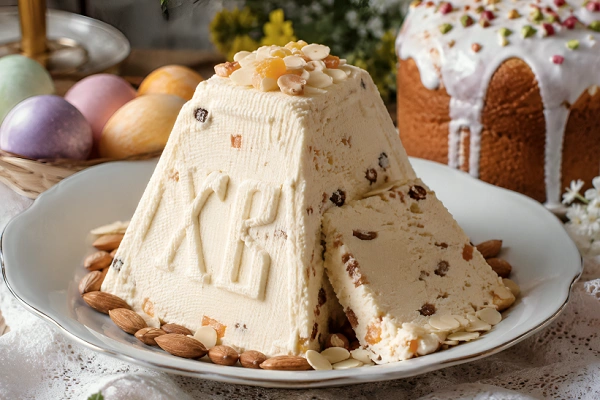
Pashka also spelled paskha, pascha, pasha, or paska is a classic no-bake chilled dessert made from farmers cheese (or curd cheese), butter, eggs, sugar, dried fruit, and nuts. The texture is like a mix between a thick cheesecake filling and a light sponge cake. It is rich, creamy, and has a strong flavor.
Unlike most Western desserts, pashka is not baked. The mixture is pressed into a mould, weighted down, and left to drain in the refrigerator for at least 24 to 48 hours. What emerges is a sliceable, molded dessert with a clean, tangy flavor from the cheese balanced by the sweetness of sugar, honey, and dried fruit.
The word “pashka” comes from Pascha, the Eastern Orthodox word for Easter. It is closely associated with the end of Lent, the 40-day fasting period when rich, dairy-based foods are celebrated again. Traditionally, pashka is brought to church on Holy Saturday to be blessed before being served on Easter Sunday.
A Brief History of Pashka
Pashka has roots stretching back to medieval Russia and the Byzantine tradition. The Eastern Orthodox Church’s Lenten calendar prohibited dairy, eggs, meat, and all rich indulgent foods for 40 days. When Easter arrived, these ingredients were gathered in celebration, and pashka was the result of one dish that used almost every “forbidden” ingredient at once.
The traditional mould for pashka is a truncated pyramid shape wider at the base, narrowing at the top. This pyramid is said to represent the tomb of Christ, and the sides are often stamped with the Cyrillic letters “ХВ” standing for Khristos Voskrese “Christ is Risen.” In Latvian tradition, the same dessert holds an equally important place in Easter customs, sometimes made with slightly different flavor accents like more citrus zest.
Over time, pashka spread through Eastern Europe and into diaspora communities worldwide. Today it is made by Russian, Latvian, Ukrainian, Greek, and Serbian communities, with each family carrying its own version of the traditional pashka recipe.
Types of Pashka: Cooked vs. Uncooked
There are two primary varieties of pashka and it’s important to grasp the difference before you decide which one to make.
Cooked (Zavarny) Pashka
A custard is made first from egg yolks, cream, and sugar, then blended with the cheese. The result is denser, richer, and firmer. Because the eggs are fully cooked, it is the safer option and keeps longer in the refrigerator. This is the version most widely made today.
Uncooked (Syraya) Pashka
Raw egg yolks are beaten directly with butter and sugar, then folded into sieved cheese. The texture is lighter and more delicate, and the dairy flavor comes through more cleanly. It requires very fresh eggs and has a shorter shelf life. This version is closer to the oldest historical recipes.
Pashka Recipe: Ingredients
The following makes approximately 8 servings.
500g farmers cheese or curd cheese, tvorog, well-drained cottage cheese, quark, or ricotta. Must be thoroughly drained before wet cheese produces a watery, unstable result. If using cottage cheese, drain it overnight through a cheesecloth before proceeding.
100g unsalted butter — softened to room temperature
3 egg yolks — from fresh, large eggs
120ml whipping cream — heavy cream works equally well
150g caster sugar — fine granulated sugar is fine too
2 tbsp honey — any mild variety
1 tsp vanilla extract — real extract, not essence
Zest of 1 lemon — freshly grated, no white pith
Zest of 1 orange — freshly grated, no white pith
60g blanched almonds — lightly toasted and roughly chopped
80g sultanas or raisins — or any dried fruit combination
2 tbsp orange juice — optional, for soaking the dried fruit
Step-by-Step Pashka Recipe Method
Start this recipe at least 48 hours before you plan to serve it. The time it spends resting and draining gives it its distinctive texture.
Step 1: Soak the dried fruit
Place sultanas or raisins in a small bowl. Pour over 2 tablespoons of orange juice (or brandy, if not avoiding alcohol). Leave to soak for a minimum of 4 to 6 hours, or overnight. Soaking the fruit makes it softer and gives the mix more flavor.
Step 2: Make the custard base
In a heavy-based saucepan, whisk together the egg yolks and whipping cream until smooth. Add the caster sugar and honey. Cook over a low heat, stirring constantly with a wooden spoon, until the mixture thickens enough to coat the back of the spoon approximately 12 to 15 minutes. Do not let it boil.
Step 3: Cool the custard completely
Place the saucepan in a bowl of cold water, or transfer to a clean bowl. Stir occasionally. The custard must be fully cold before combining with the cheese warmth will melt the butter and break the mixture apart. If the custard curdles at any point, beat it with a hand mixer until smooth again.
Step 4: Process the cheese and butter
Push the farmer’s cheese through a fine sieve, or blend it with the softened butter in two batches until the mixture is completely smooth and lump-free. This step directly affects the final texture a silky smooth paste produces a refined, sliceable pashka.
Step 5: Combine all elements
Stir the cold custard into the cheese-butter mixture until uniform. Fold in the lemon zest, orange zest, toasted almonds, and soaked dried fruit. Do not overmix fold gently to preserve the texture of the fruit and nuts.
Step 6: Prepare the mold
Line a special pashka mould, a clean terracotta flower pot (with a drainage hole) or a fine mesh strainer with two layers of moist muslin fabric or cheesecloth. The lining must be large enough to fold over the top when filled.
Step 7: Fill and weigh the mold
Spoon the mixture firmly, smoothing the top flat. Fold the muslin edges over the surface. Place a small flat plate on top and weigh it down with a heavy tin. Put the mould on a shallow tray to catch the liquid which runs off.
Step 8: Refrigerate
Place the entire setup in the refrigerator. Leave undisturbed for at least 24 hours ideally 48. Discard any collected liquid periodically. The longer it sits, the firmer and more defined the final shape becomes.
Step 9: Unmould and serve
Remove the weights. Unfold the muslin from the top. Place your serving dish face-down on the mould, then invert in one smooth motion. Carefully peel away the muslin. The pashka should hold its shape cleanly. Garnish with extra toasted almonds, fresh berries, or a small amount of candied citrus peel.
What Does Pashka Taste Like?
The flavor of a well-made pashka is mildly tangy from the curd cheese, rich and buttery from the egg custard, and fragrant from the citrus zests. The dried fruit provides background sweetness and occasional crunch, while the almonds offer a slight nutty contrast to the otherwise smooth body of the dish.
It is not aggressively sweet. The honey and sugar are present but restrained, which allows the natural character of the cheese to remain the dominant note. The whole sensation is refined, not indulgent, sophisticated, cool and quietly gratifying in a manner that very few desserts are.
Variations on the Classic Pashka Recipe
Latvian-style Pashka places more emphasis on fresh citrus zest and toasted flaked almonds, often reducing or eliminating candied fruit entirely. The cheese is typically drained longer, producing a firmer, drier result with a cleaner flavor.
Uncooked Syraya Pashka omits the custard completely and instead has raw egg yolks whipped with butter, creating a lighter, more delicate texture. It is the closest version to the oldest historical recipes and should be consumed within two days of making.
Chocolate Pashka folds dark chocolate, rum-soaked raisins, and slivered almonds into the base. Originally Easter-specific, this version has found a place as a festive winter dessert served alongside warm holiday puddings, the chilled, dense texture working well as a contrast.
Alcohol-free Pashka replaces brandy or rum with orange juice, apple juice, or rose water. The dried fruit still plumps effectively, and rose water adds a delicate floral note that complements the citrus zest particularly well.
What to Serve with Pashka
In traditional Russian and Eastern Orthodox households, pashka is almost always served alongside kulich, a tall, domed sweet yeast bread flavored with saffron, cardamom, and dried fruit, decorated with white icing. The pairing is intentional: the dense, cold pashka and the soft kulich are meant to be eaten together, slices of bread used almost as a vehicle for the cheese dessert.
Outside of that tradition, pashka pairs well with fresh strawberries or raspberries, toasted almond bread or brioche, or a light drizzle of honey for guests who prefer additional sweetness. It is also entirely self-sufficient as a standalone dessert; it needs nothing alongside it.
Storage and Make-Ahead Tips
Pashka genuinely improves with time. The flavor develops significantly over 48 to 72 hours as the citrus, dairy, and fruit notes meld together, which makes it an ideal dessert to prepare well ahead of serving.
The pashka can remain in its mould in the refrigerator for up to 3 days before unmoulding, keeping the weight on and draining any collected liquid daily. Once unmoulded, wrap leftovers loosely and consume within 2 to 3 days.
Because the mixture contains egg and dairy, it should not be left at room temperature for extended periods. Pashka does not freeze well. The cheese-based texture becomes grainy after thawing, so make only as much as will be consumed within a few days.
Common Mistakes to Avoid
Using wet cheese is the single most common cause of a failed pashka. Always drain the cheese thoroughly ideally overnight before use. See the ingredients section above for which cheeses work best.
Adding warm custard to the cheese is the second most damaging mistake. The custard must be completely cold before combining see Step 3 for the cooling method.
Skipping the weight means the mixture will not drain properly and will remain loose and soft. Applying firm, even pressure over the full draining period is essential for a sliceable result.
Not lining the mould properly always uses a double layer of damp muslin. A single layer often tears or sticks, making unmoulding messy and damaging the surface of the dessert.
If you remove the pashka from the mold too early, after just 12 hours, it will not be solid enough to come out cleanly. 24 hours is the minimum; 48 produces a noticeably better result.
Last Words
The pashka recipe is one of the most distinctive and underappreciated desserts in the Eastern European culinary tradition. It requires no oven, very little active time to prepare, and makes something that is really unlike anything in Western baking: a cold, sliceable, intensely flavored molded curd cheese delicacy with centuries of history behind it.
The key variables are the quality and dryness of the cheese, the patience to let it drain fully, and the balance of flavors citrus zest, dairy, nuts, and dried fruit all present but none overwhelming the others. Done correctly, pashka is a striking dessert in both appearance and flavor, and one that rewards the time invested in making it properly.

Rachel Bradley is a food writer and recipe developer with a love for home cooking and global flavors. She has spent years testing recipes in her kitchen, exploring everything from quick weeknight meals to traditional dishes from around the world. Her goal is simple — make great food accessible to everyone.